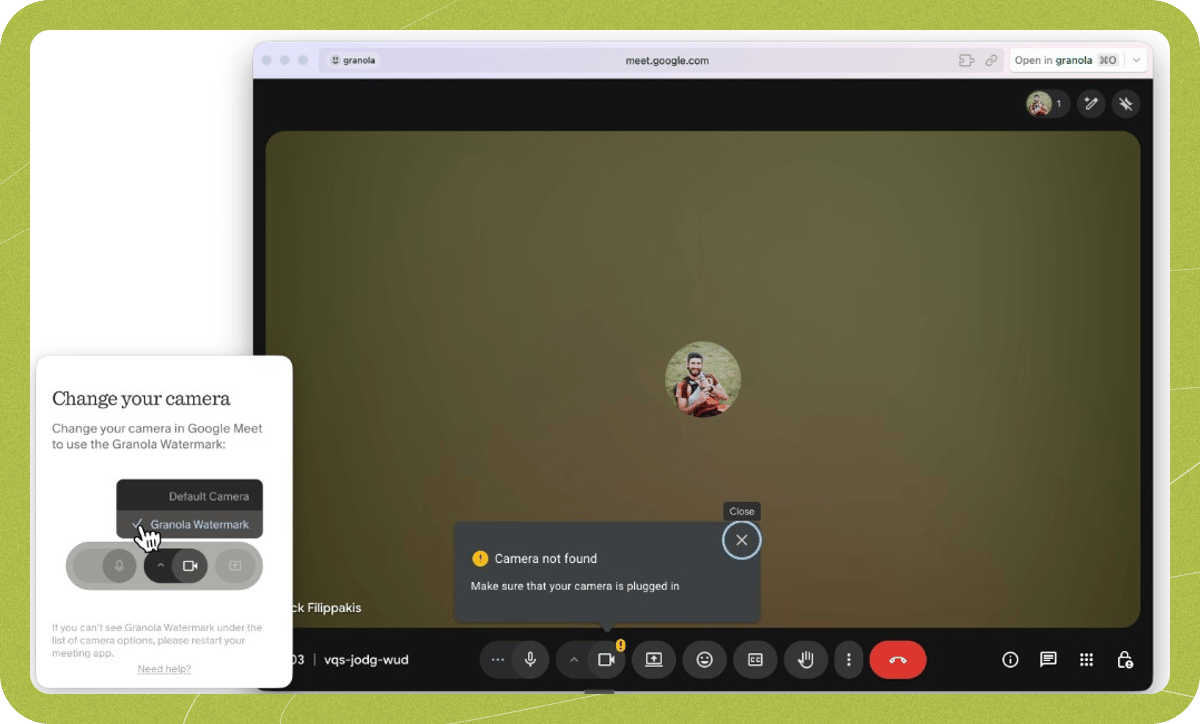

This guide is for workspace members setting up Granola Watermark on their own desktop app — whether you’re turning it on yourself or your workspace requires it. Are you an Enterprise admin configuring this for everyone? See the admin guide.
Set up Granola Watermark
1. Start the one-time setup
How you start the one-time setup depends on whether you’re turning the watermark on yourself or your workspace requires it. Both paths lead to the same installation dialog.- Turning it on yourself
- Your workspace requires it
-
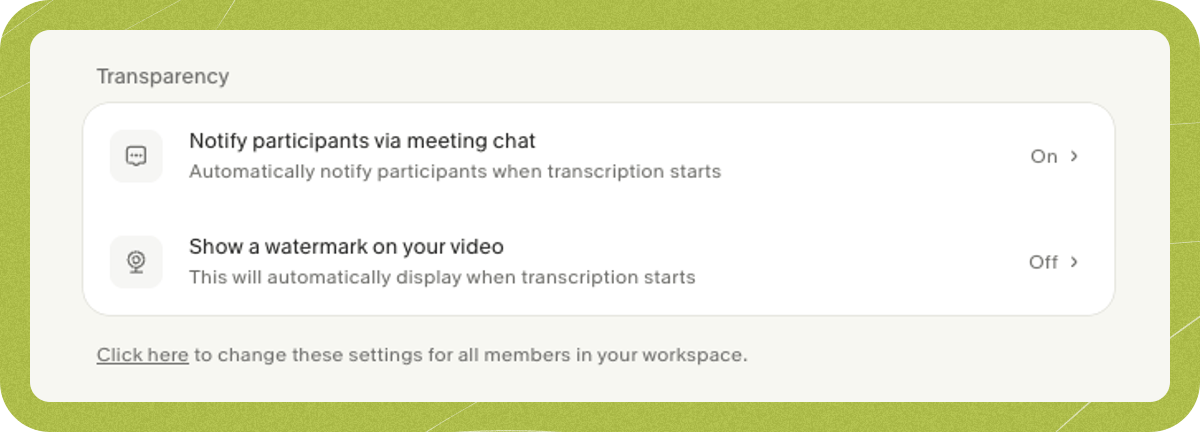
Go to Settings > Preferences > Transparency > Granola Watermark.
-
Next to Granola Watermark, click Set up.
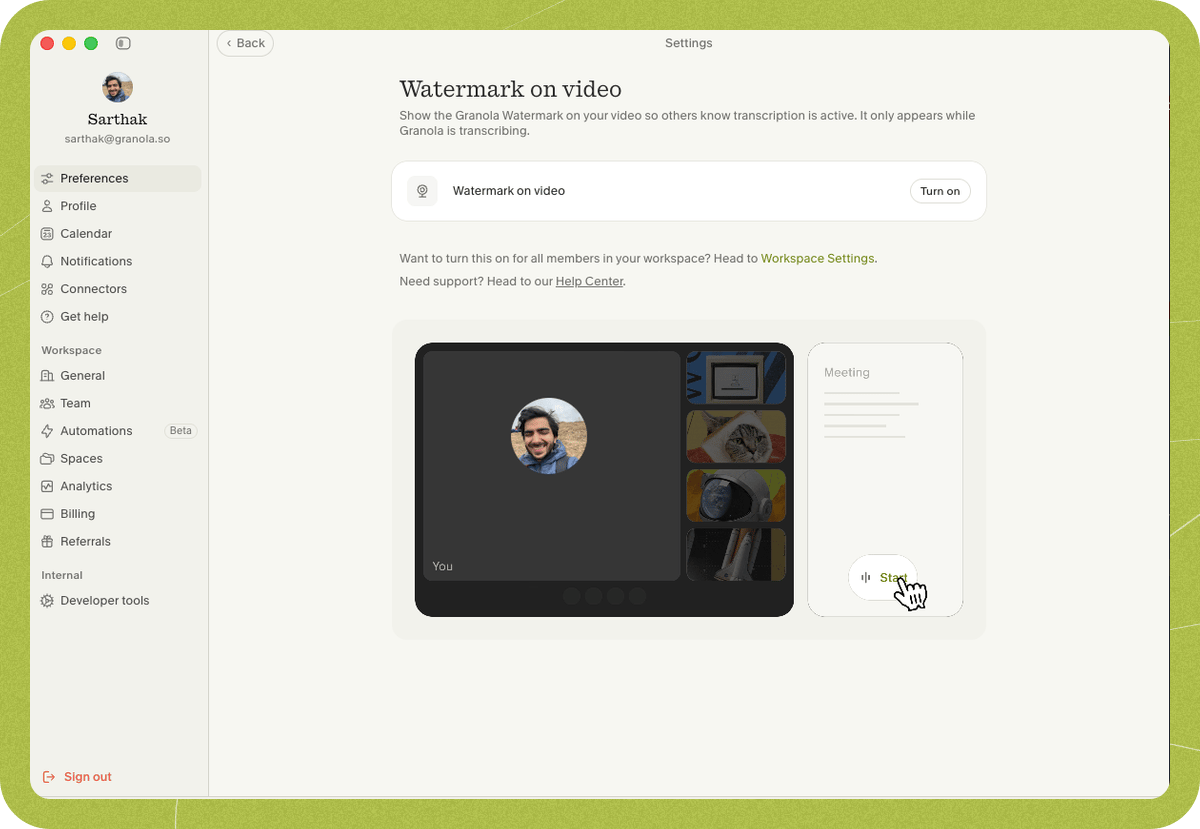
2. Install the Granola camera
In the setup dialog that opens, go through the installation steps for your platform.- macOS
- Windows
- Click Add extension to install the Granola camera.
- A macOS system dialog appears. Click Open System Settings — not OK.
- In System Settings, toggle on the Granola camera extension and confirm with your Mac password or Touch ID.
- Return to Granola — the watermark is now ready to use.
3. Select Granola Watermark in each meeting app
The first time you use a meeting app after installing, choose the Granola camera in that app’s video settings. It’s named after your existing camera with- Granola Watermark added — for example, FaceTime HD Camera - Granola Watermark on macOS or Integrated Camera - Granola Watermark on Windows. Some Windows apps also add (Windows Virtual Camera) to the end of the name. Most apps remember the choice, so you only do this once per app.
It also works in Slack and any other app that lets you pick a camera source — choose the
<your camera name> - Granola Watermark camera in that app’s video settings.
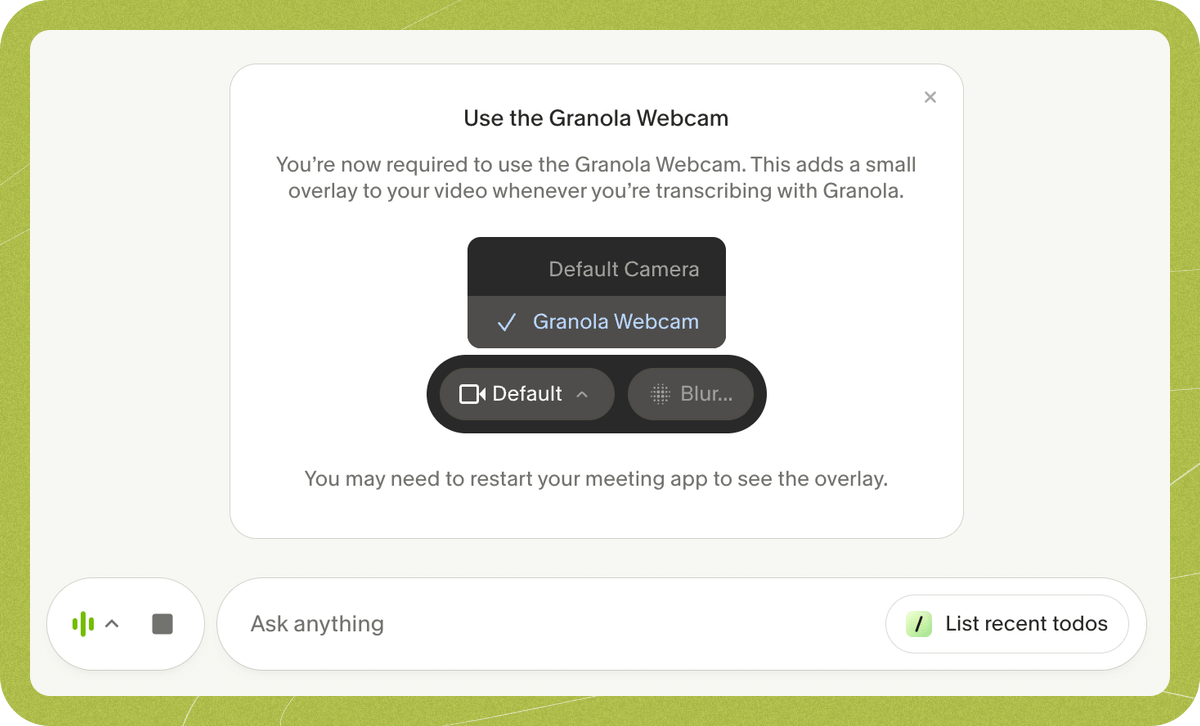
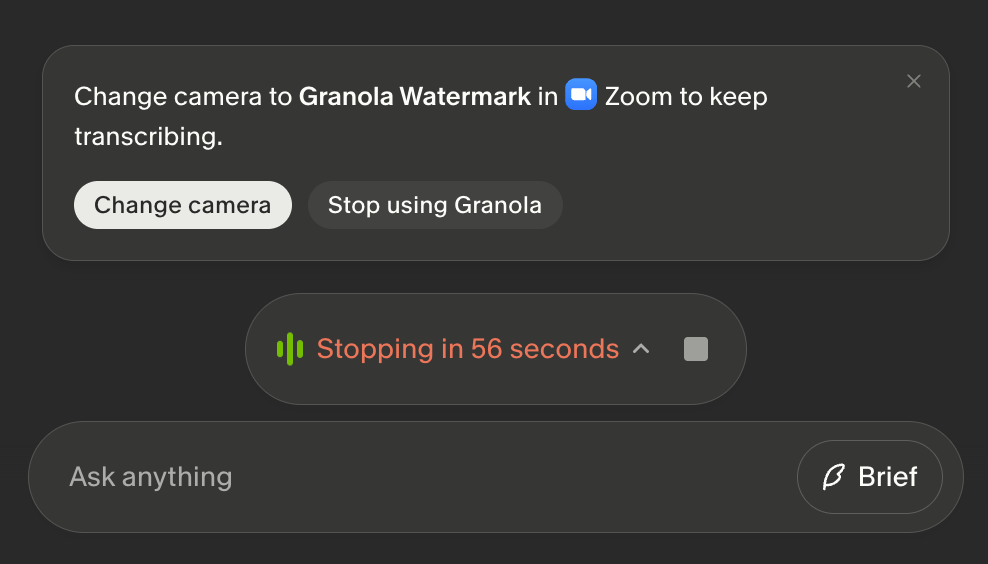
Until you switch cameras, Granola shows a reminder in the meeting view:
Troubleshooting
I can't see Granola Watermark in my meeting app's camera list
I can't see Granola Watermark in my meeting app's camera list
On macOS, first make sure Granola is running. Granola cameras are only available while Granola is open; if you quit Granola completely, the cameras disappear from meeting apps. On Windows the camera stays in the list even when Granola isn’t running.If the cameras still don’t appear, fully quit and reopen the meeting app, then check the camera picker again. For browser-based meetings, quit and reopen the whole browser, not just the meeting tab. This applies to Zoom, Google Meet in Chrome, Slack, Microsoft Teams, and other meeting apps.
The `Transcribing` text looks backwards in my self-view
The `Transcribing` text looks backwards in my self-view
Most meeting apps mirror your own video preview, so text in your self-view can look backwards. Other participants usually see the non-mirrored version, with the watermark text the right way around.
My transcription stopped
My transcription stopped
If your workspace admin requires Granola Watermark, they may also have a fallback option — an automated chat message — for camera-off situations. If your camera is off, or the chat message doesn’t send during a meeting when your admin enforces transparency across the workspace, Granola may stop transcribing with a countdown.To resume transcribing, click Show Granola Watermark in the reminder next to the Granola nub, or Change camera in the meeting view.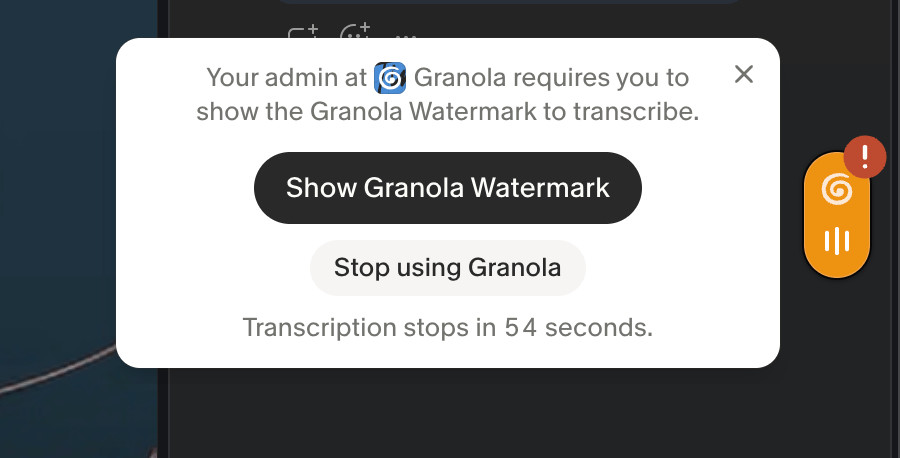
The watermark is cut off or not visible to others
The watermark is cut off or not visible to others
This is rare, but some meeting apps crop your outgoing video to fit their layout. When that happens, the watermark can be pushed partially or fully off-screen for other participants.If this happens, update your meeting app settings:
- Google Meet: In a meeting, hover your self-view tile, click More options, then choose Show my full video to others.
- Zoom: Open Settings > Video & effects and turn on Original ratio. This often helps, but some participants may still see cropped framing depending on their Zoom layout/view settings.
- Microsoft Teams: Teams currently doesn’t offer an equivalent setting for your own outgoing video. Other participants can try Fit to frame for their own view of your video.
Run the Granola Watermark troubleshooting check
Run the Granola Watermark troubleshooting check
Granola can check whether the Granola camera is installed and working. Open Settings > Get help in Granola, click Troubleshooting, then find Granola Watermark.
- macOS
- Windows
Granola shows the status of the helper, the camera extension, and the extension daemon.Click Copy details if you need to send diagnostics to support, or Reinstall extension if Granola reports a problem.
[macOS] I can't find the Granola extension in System Settings
[macOS] I can't find the Granola extension in System Settings
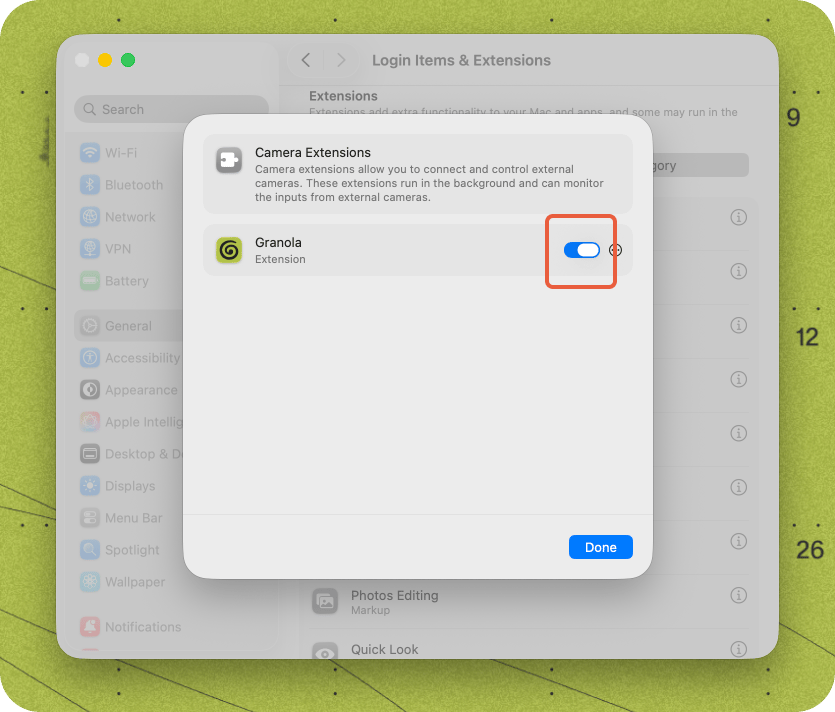
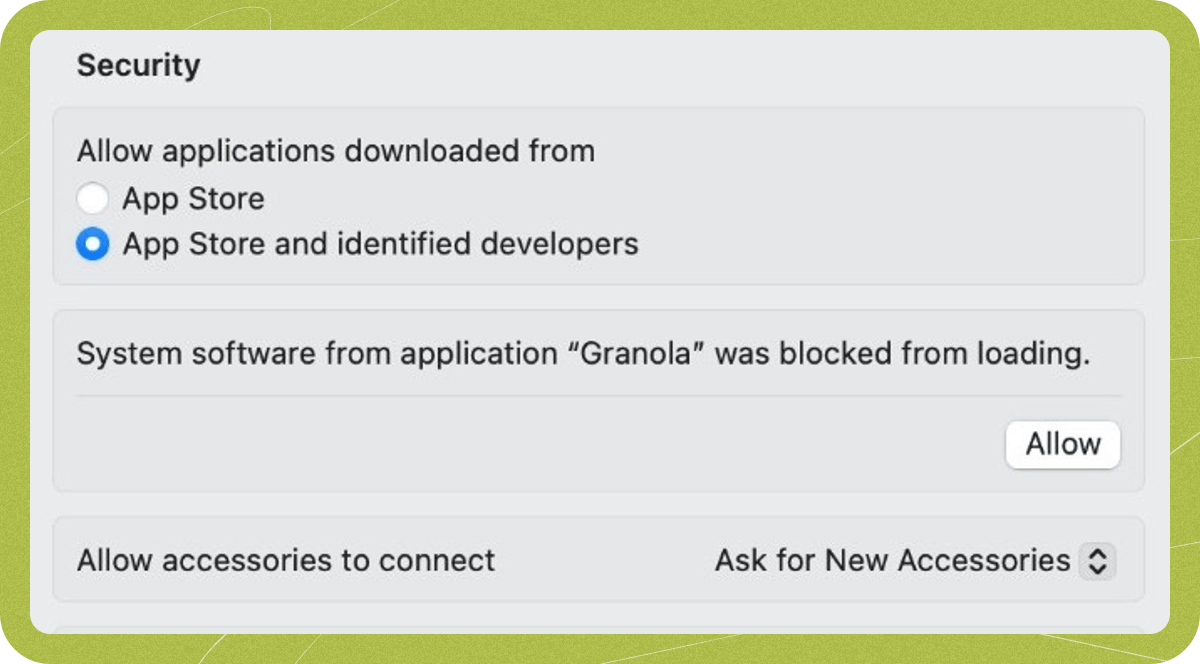
If you dismissed the setup dialog (clicked OK instead of Open System Settings), or Granola can’t open the right page automatically, you can enable the extension manually. Depending on your macOS version, it appears in a different place.After enabling the extension, enter your Mac password or use Touch ID to confirm, then return to Granola.
- macOS 15 or later
- macOS 14
- Open System Settings.
-
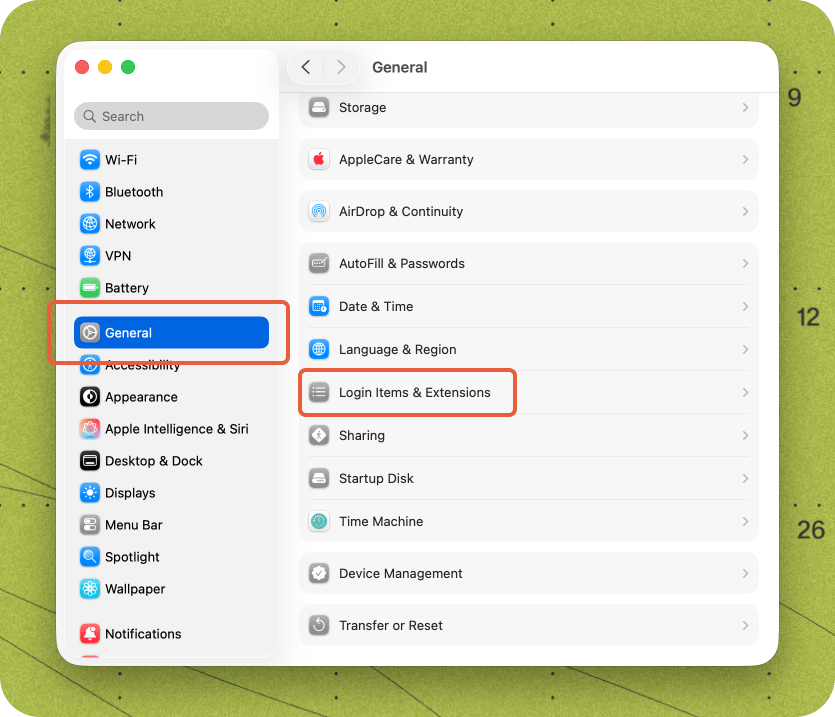
Go to General > Login Items & Extensions.
-
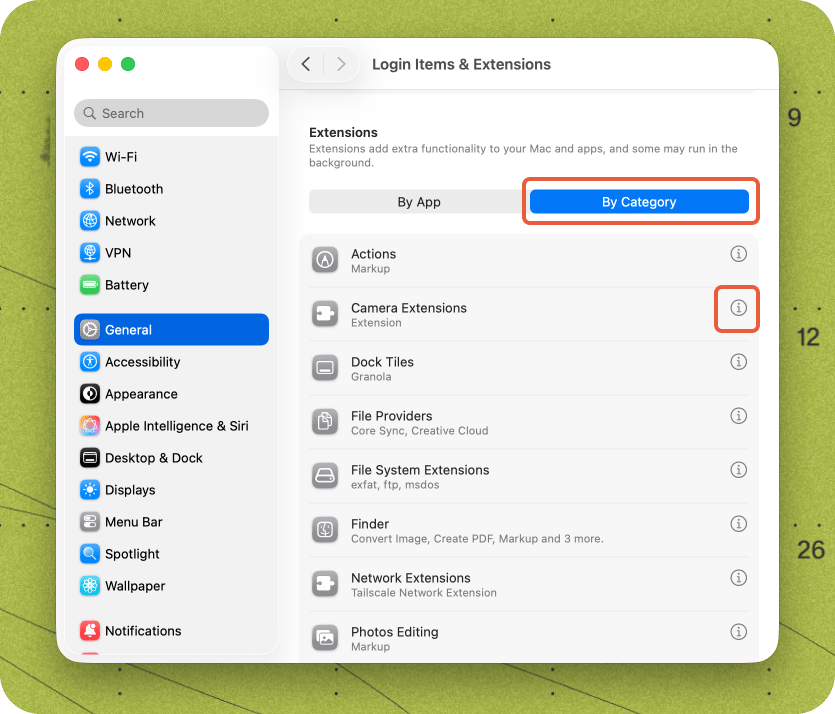
Scroll to By App and By Category, click By Category, then click the info icon next to Camera Extensions.
-
Enable the Granola extension.
- If Granola also asks for camera access, go to Privacy & Security > Camera and enable Granola. Camera access is separate from the camera extension approval.
[Windows] I selected the Granola camera but no watermark appears
[Windows] I selected the Granola camera but no watermark appears
On Windows the Granola camera stays available in your meeting app even when Granola isn’t running — but the watermark itself only appears while Granola is open and transcribing. If your video looks normal with no badge, check that Granola is running, then start transcribing.
[Windows] Granola says it needs to update the watermark
[Windows] Granola says it needs to update the watermark
Granola shows a Granola needs to update the watermark card on Home when Windows still has an older version of the camera loaded. You have two ways to resolve it:
- Click Give access and choose Yes on the Windows administrator prompt. Close Zoom, Teams, and your browser first.
- Or simply restart your computer, which completes the update automatically without any prompt.
[Google Meet] I'm stuck at the `Change your camera` step
[Google Meet] I'm stuck at the `Change your camera` step
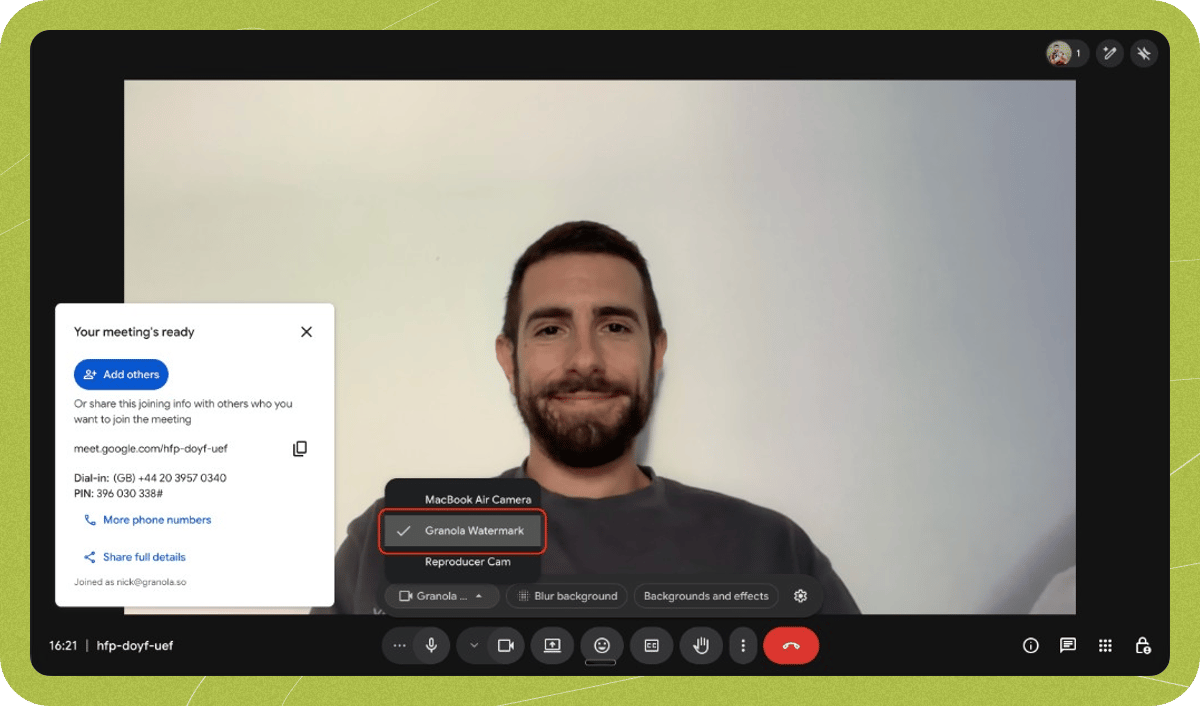
Granola needs to detect you using the Granola camera.
- Open a new browser tab.
-
Type
meet.newin your URL bar and pressEnter. -
Select a Granola Watermark option as your camera.
If you still can’t see the camera, try quitting and restarting your browser.
- All set! Make sure you use this camera in all of your meetings.
[Zoom] I'm stuck at the `Change your camera` step
[Zoom] I'm stuck at the `Change your camera` step
Granola needs to detect you using the Granola camera.
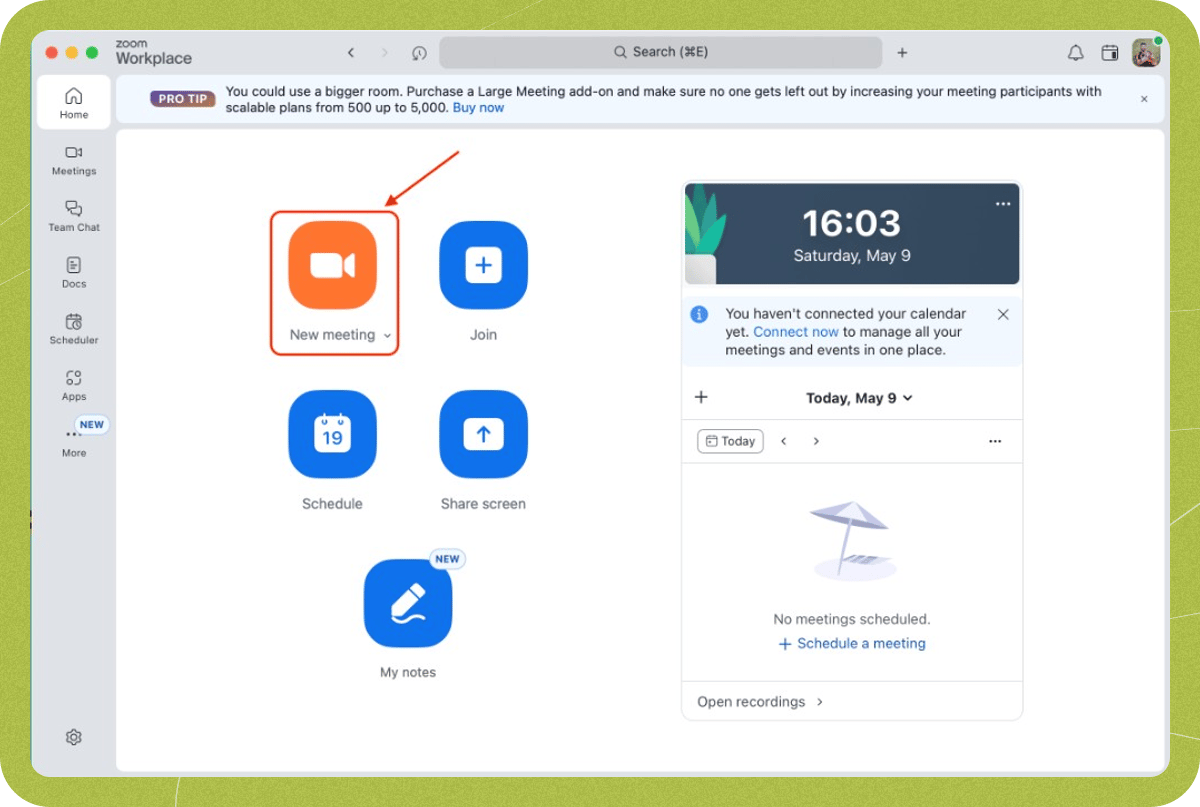
- Open the Zoom app and make sure you’re logged in.
-
Start a new meeting.
-
Select a Granola Watermark option as your camera.
If you still can’t see the camera, try quitting and restarting Zoom.
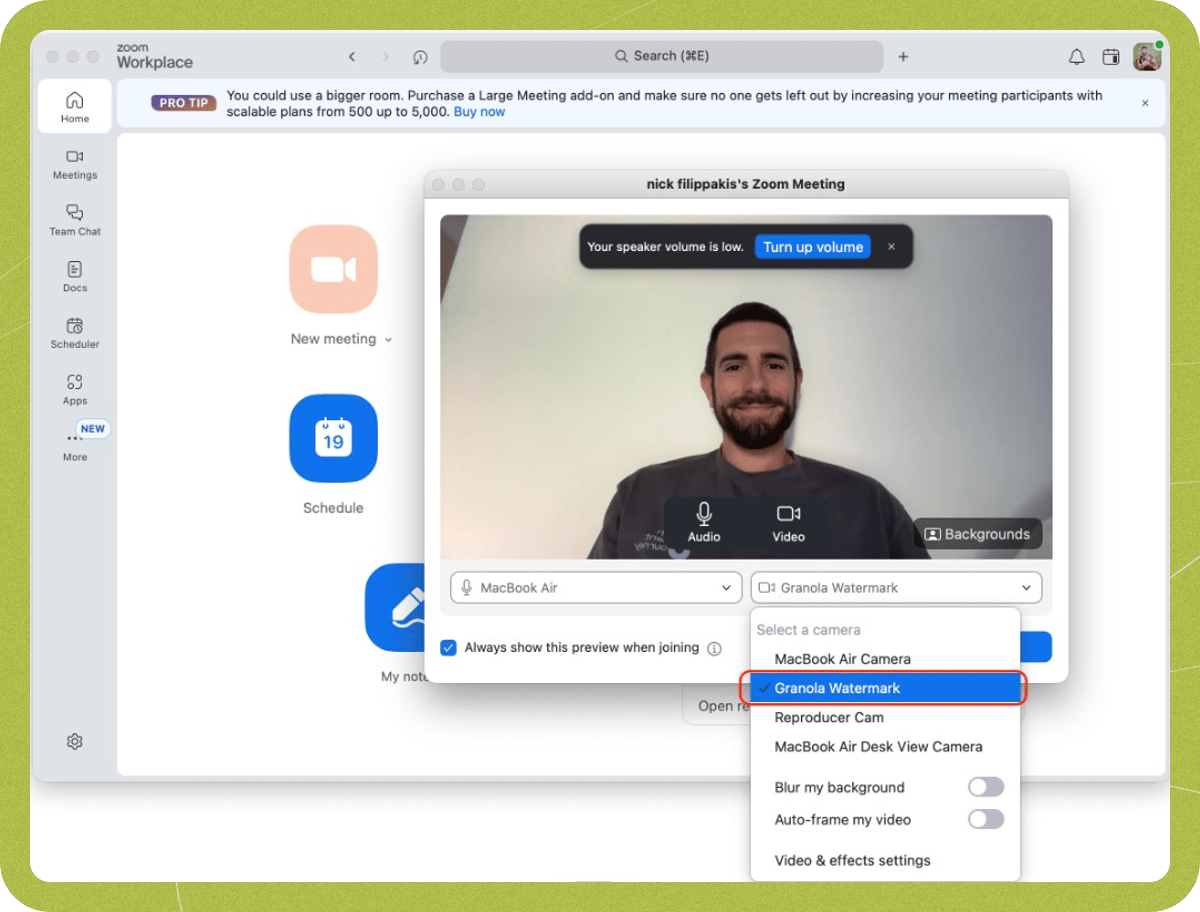
- All set! Make sure you use this camera in all of your meetings.
[Microsoft Teams] I'm stuck at the `Change your camera` step
[Microsoft Teams] I'm stuck at the `Change your camera` step
- Open the Microsoft Teams app and make sure you’re logged in.
-
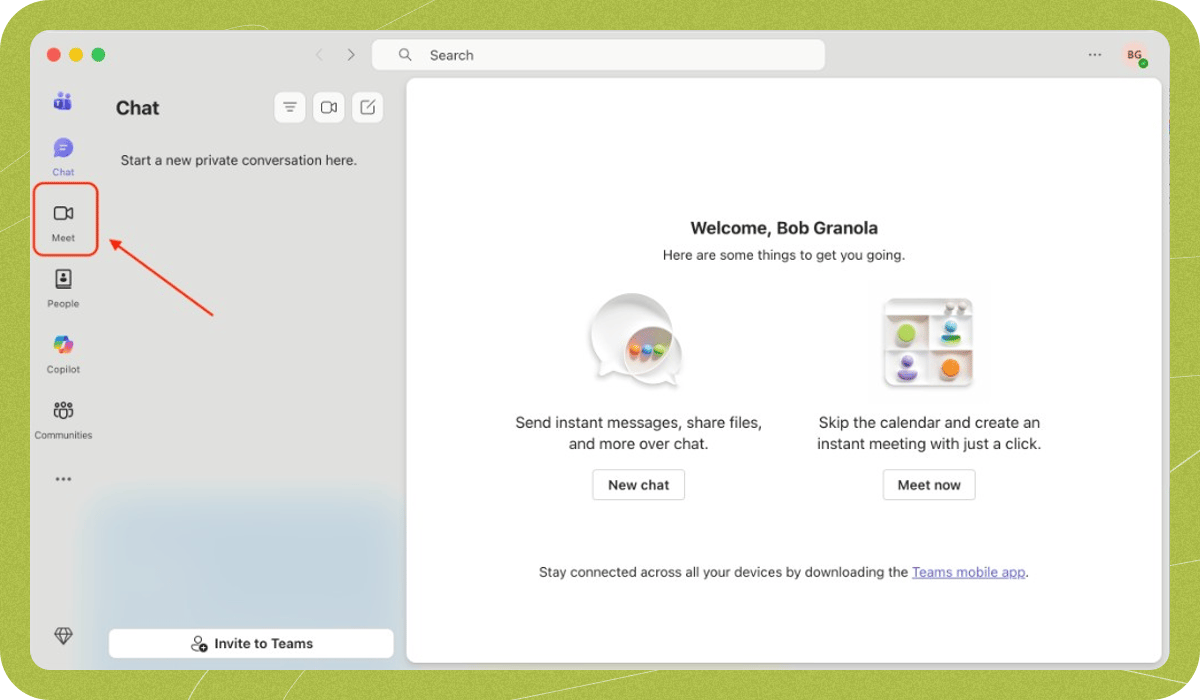
Click Meet.
-
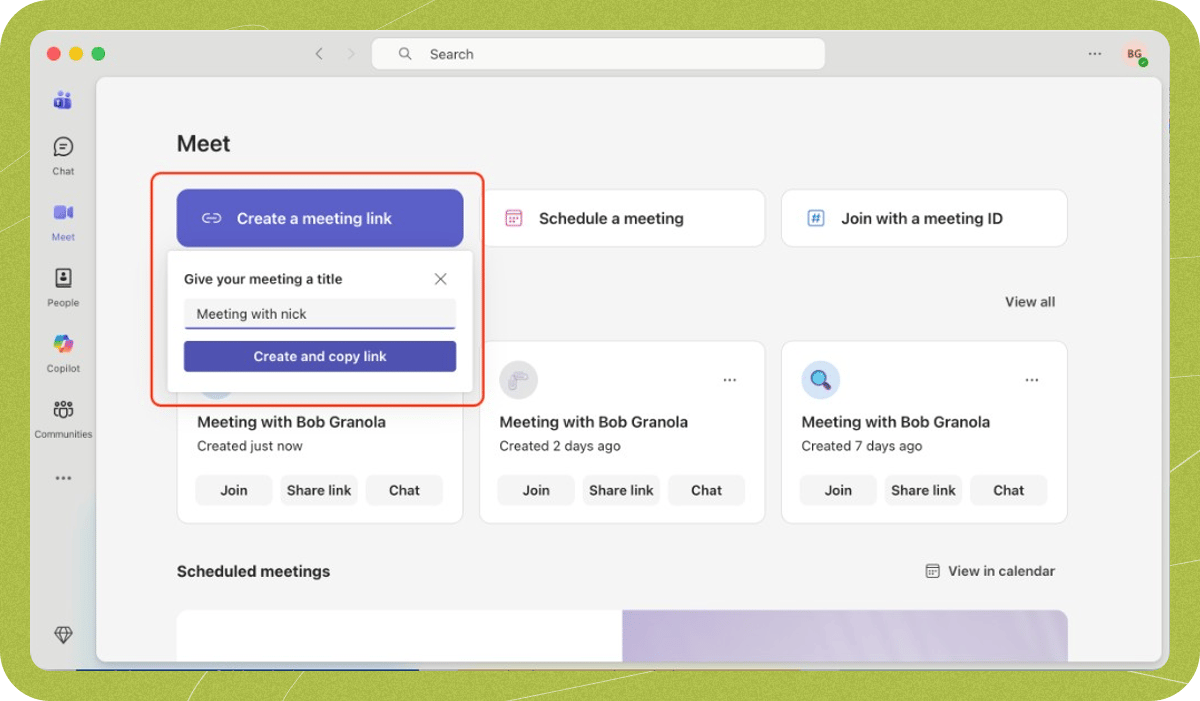
Click Create a meeting link, then Create and copy link.
-
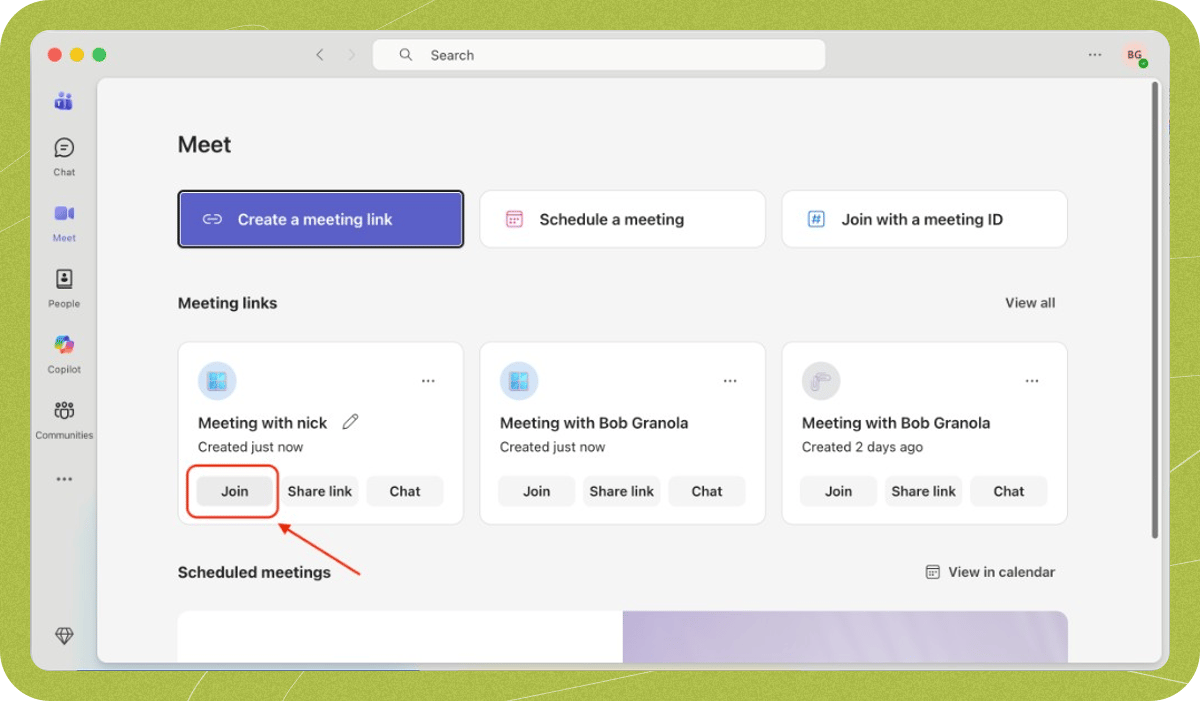
Click Join for the meeting you just created.
-
Select a Granola Watermark option as your camera.
If you still can’t see the camera, try quitting and restarting Microsoft Teams.
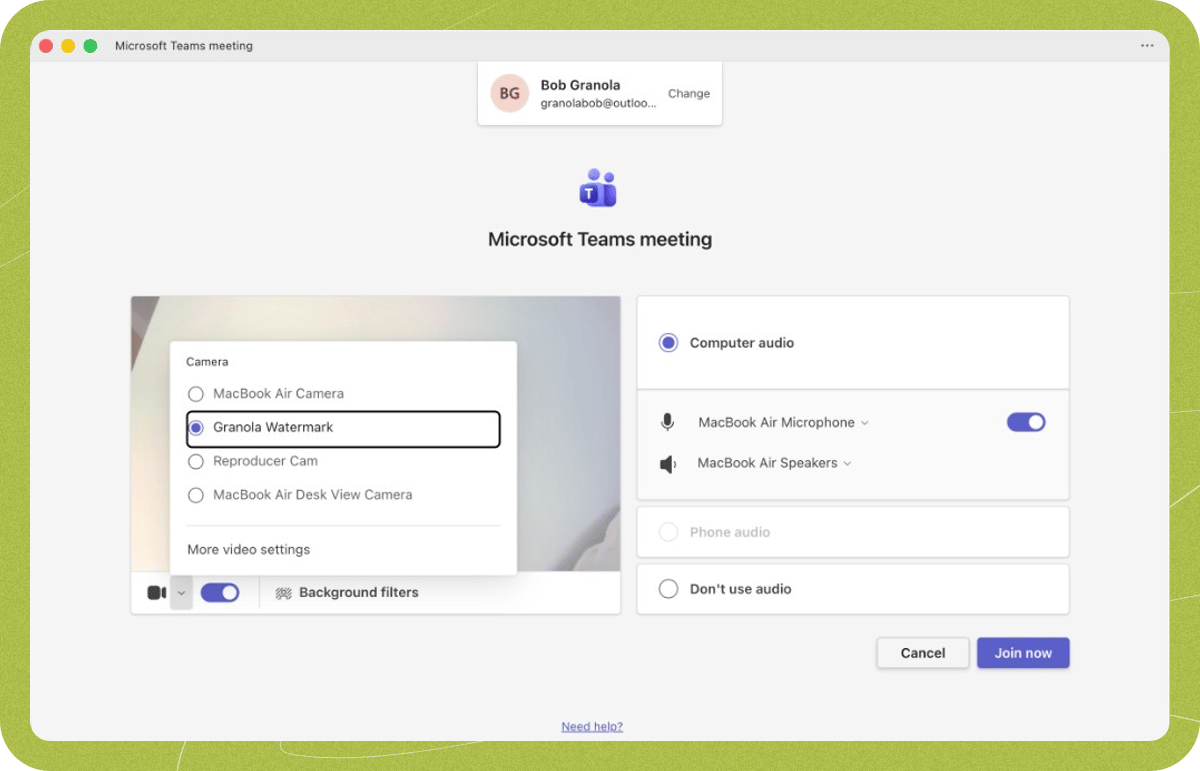
- All set! Make sure you use this camera in all of your meetings.
My browser meeting shows `Camera not found`
My browser meeting shows `Camera not found`
This can happen in browser-based meetings (Google Meet, Zoom web, Teams web, etc.) when the camera list gets out of sync — for example, right after installing or updating Granola Watermark.